
If you’re a seasoned barista or a die-hard coffee enthusiast, you know that great coffee gear should deliver two must-haves: consistent extraction and user-friendly operation—plus, it should fit seamlessly into any setting. The newly launched IKAPE KAPO K2 Pro Portable Coffee Maker checks all these boxes, thanks to its 58mm bottomless portafilter—a pro-grade feature that lets you brew café-quality espresso whether you’re camping outdoors or cranking through a workday at the office. This guide will walk you through every step, from unboxing to brewing and maintenance, so you can master this machine like a pro.
I. First Things First: Unboxing & Key Component Breakdown
Before firing up your KAPO K2 Pro, take a minute to get familiar with its parts—this will make your brewing journey way smoother. Inside the box, you’ll find these core components:
Main unit (with built-in heating system), Puck screen, Coffee filter basket, Tamper, Dosing funnel, Simple distribution tool, Cleaning brush, Velvet storage bag, Coffee scoop, Type-C charging cable, and User manual.

Let’s highlight two standout pro features:
58mm diameter design: A game-changer that’s missing from most portable home machines. Matching the size of commercial café equipment, it holds more coffee grounds, ensuring even pressure distribution across the puck to minimize channeling.
Bottomless basket: Lets you visually track the “golden espresso stream” in real time. This front-row seat to extraction helps you tweak your settings on the fly, making it easy for newbies to level up their brewing skills fast.
II. Step-by-Step Brewing Guide: From Prep to Perfect Espresso
This machine is easy to use—master three key variables (dose, grind size, water temperature) and you’ll nail great shots every time, even as a beginner.
Step 1: Prep & Grind (Don’t Skip This Foundation)
First, gather your supplies: fresh coffee beans (light or medium roasts like Yirgacheffe or Ethiopian are ideal—they shine with bright acidity and fruity notes), a grinder, and your tamper.
Recommended parameters:
Double shot: 18-20g of grounds (start with 18g if you’re new).
Grind size: Similar to what you’d use for home espresso machines, or slightly finer. Too coarse = fast extraction = weak, watery espresso. Too fine = slow extraction = bitter, over-extracted shots.
Pro tip for grinder-less newbies: Ask your local roaster to grind beans to a “58mm commercial espresso machine” setting. Then adjust finer or coarser based on your first extraction results.
Note: For a single espresso shot, you’ll need to purchase a compatible single-shot filter basket separately.
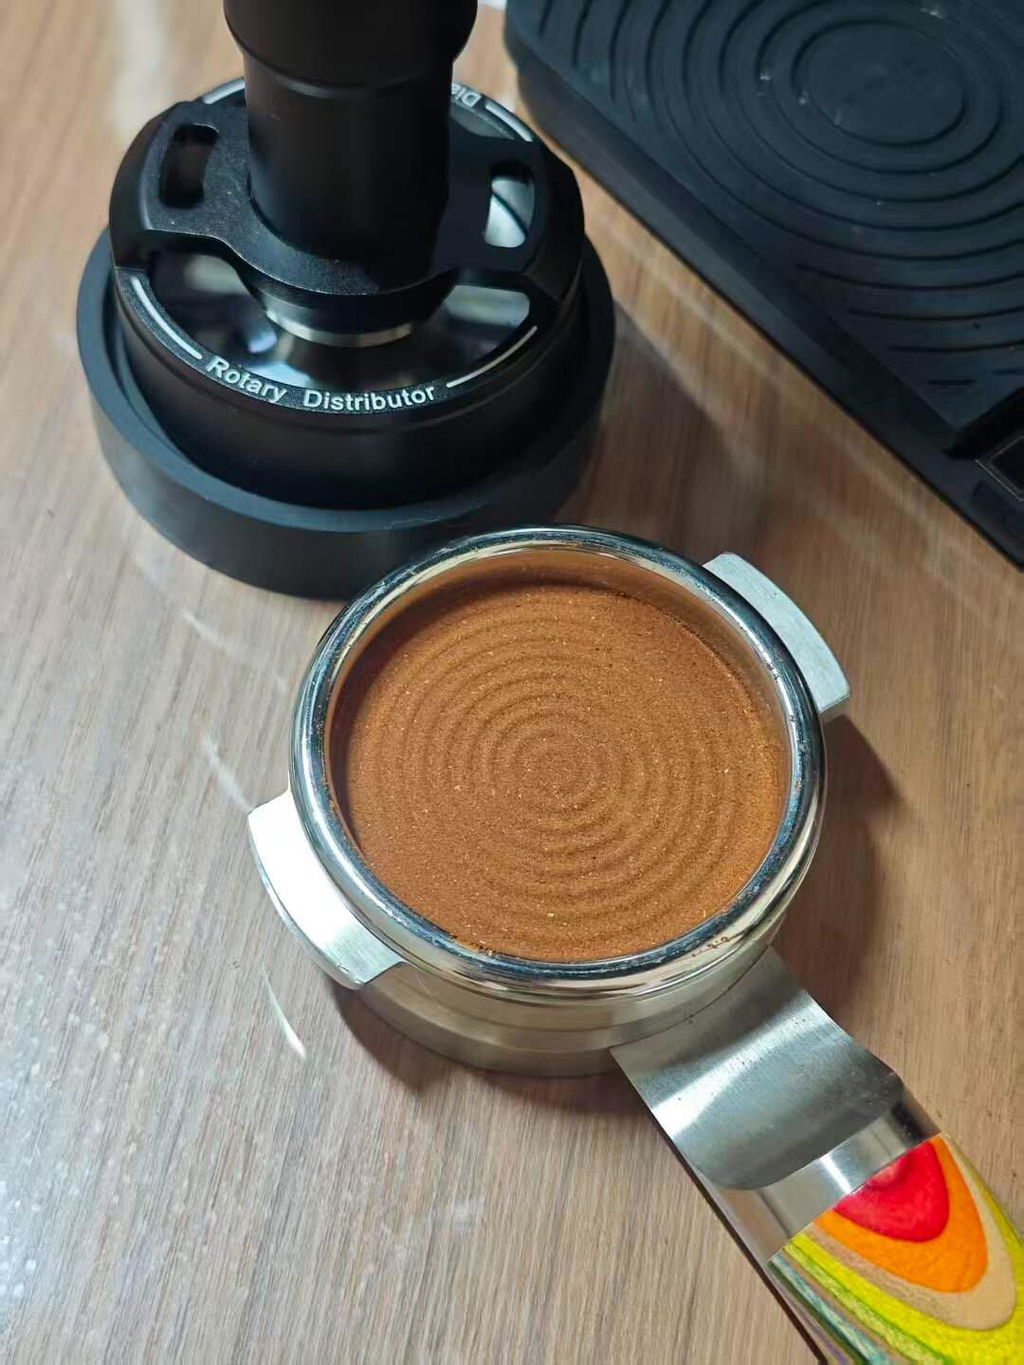
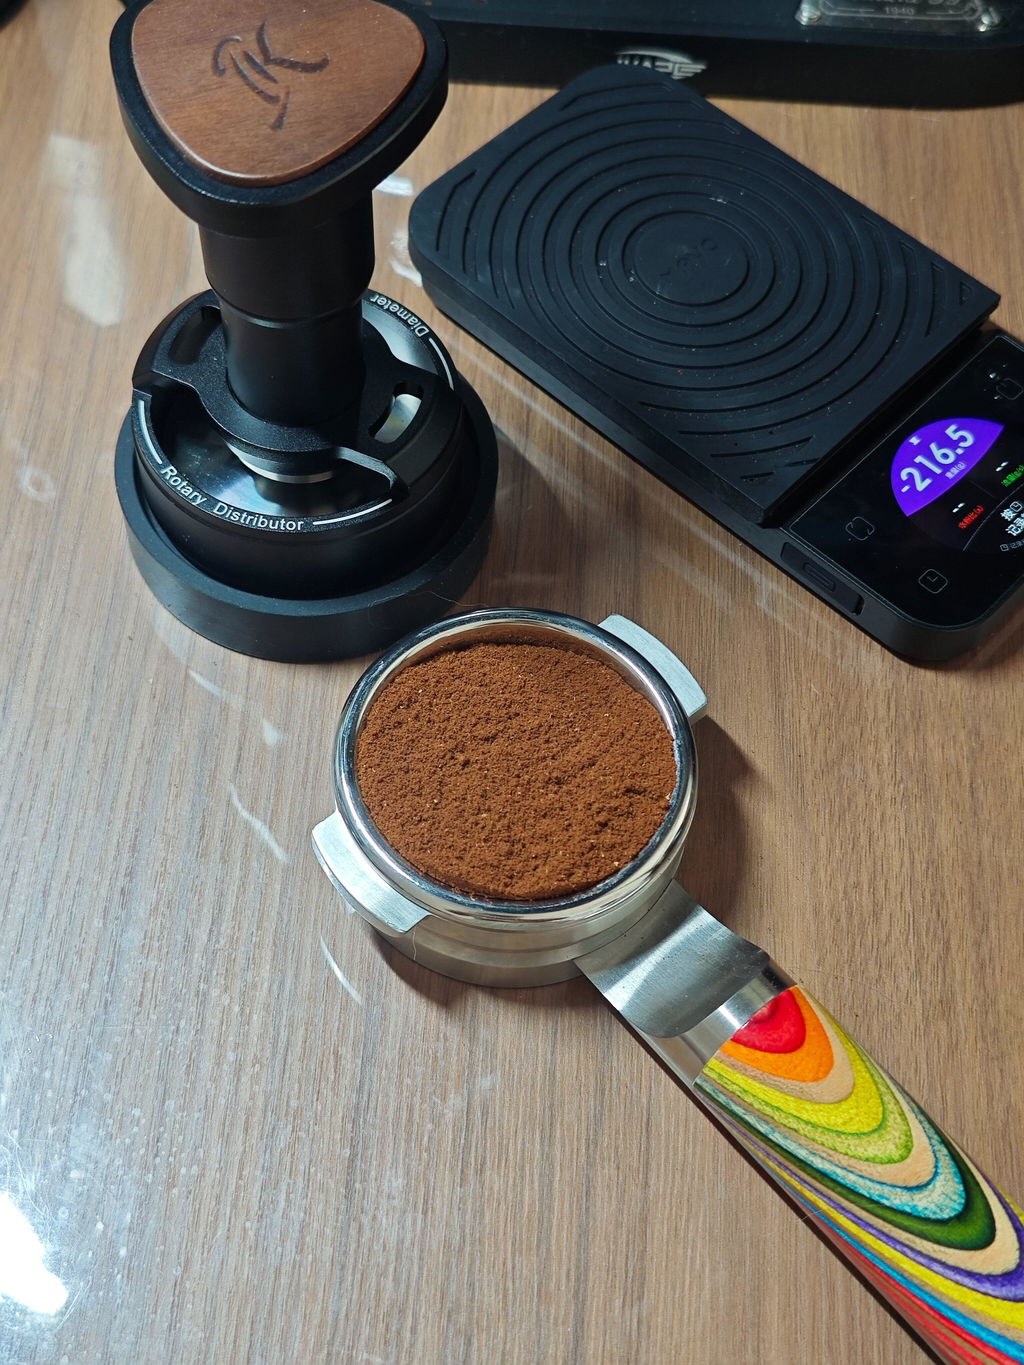
Step 2: Dose & Tamp (Uniformity is Key)
Pour the ground coffee into the 58mm filter basket. Gently level the puck with your finger-no dips or mounds allowed. Then, tamp straight down with 20-30 pounds of pressure (newbies, don’t stress about the exact number; just press firmly and evenly—over-tamping can clog the extraction path). Wipe off any excess grounds from the basket’s rim with a clean cloth or brush to avoid leaks and ensure a tight seal.
Lock the loaded basket into the bottomless portafilter by twisting it clockwise until it’s fully secured (stop when it won’t turn anymore) to prevent leaks during brewing.
Step 3: Machine Setup & Extraction (The Core Process)
Fill Water & Power On
Open the top water tank lid and fill it with purified water (tap water is a no-go, it causes limescale buildup that shortens the machine’s life and ruins coffee flavor). Keep the water level below the “MAX” line.
Critical note: Use at least 50ml of water. The machine uses 15-20ml during the extraction process. 50ml of input typically yields 30–35ml of espresso; we recommend 60ml for a more consistent shot volume. Final yield may vary slightly based on your specific brewing parameters.
Press and hold the power button for 1 second to turn on the machine. It will start heating up, wait 3-5 minutes until all four indicator lights turn on. The default extraction temperature is 88-92℃ (perfect for most beans—no adjustments needed for beginners). Advanced brewers can tweak it: 90–92℃ for light roasts, 88–90℃ for dark roasts. Double-tap the power button for instant hot water extraction. For more precise controls, connect the machine to its dedicated app.
Start Extraction
Align the portafilter with the machine’s brewing group and lock it in place. Place a small espresso cup (60-80ml capacity works best) underneath. Press the “brewing button” to start pressure extraction.
Ideal metrics: Extraction should take 25-30 seconds, yielding 36-40ml of espresso (a 1:2 coffee-to-liquid ratio—this is the golden standard for beginners).
Monitor the Extraction Stream
Keep an eye on the flow from the bottomless portafilter: A perfect shot pours as a steady, uniform golden stream with no big bubbles or sputtering.
Fast flow (40ml in under 20 seconds) = grind too coarse → go finer next time.
Slow flow (less than 36ml after 35 seconds) = grind too fine → go coarser next time.
Uneven flow (stream only comes out one side) = uneven tamping → re-level and re-tamp the grounds.
Step 4: Taste & Adjust (Tweak for Your Preference)
After brewing, take a whiff—fresh espresso should smell bright with notes of fruit, caramel, or chocolate. Take a sip, then adjust your parameters based on the flavor:
Weak and watery? Add 1-2g more grounds or use a finer grind next time.
Bitter and overpowering? Reduce the dose or use a coarser grind.
Too acidic? Lower the extraction temperature slightly (e.g., from 92℃ to 90℃).
Want to make lattes or cappuccinos? Just top the espresso with steamed or frothed milk. Even as a portable machine, the KAPO K2 Pro pulls shots with rich, velvety crema that blends beautifully with milk for a smooth, café-worthy drink.

III. Pro Tips: Avoid Beginner Mistakes & Level Up Your Brews
1. Beginner Pitfall Avoidance
Don’t chase “perfection” on your first try. Start by locking in your dose and grind size, then adjust only one variable at a time (e.g., tweak grind size first) to see how it impacts extraction—this makes it easier to find your sweet spot. Also, expect a few drips after extraction—place a paper towel under your cup to keep your counter clean.
2. Advanced Optimization Hacks
Pre-infusion: For more balanced flavor, advanced users can set a pre-infusion time via the app. This lets a small amount of hot water wet the grounds; wait 3-5 seconds before full-pressure extraction to let the puck expand evenly.
Seasonal temperature tweaks: Use slightly lower temps (88℃) in summer to avoid over-extraction, and slightly higher temps (92℃) in winter to compensate for faster heat loss.
3. Portable Use Tips
Weighing in at just 820g and sized like a travel mug, this machine is perfect for camping or office use when paired with its storage bag.
Outdoor use: Charge it with a portable power bank before heading out.
Office use: Don’t overfill the water tank to prevent leaks when moving the machine.
IV. Cleaning & Maintenance: Extend Machine Life & Keep Flavors Consistent
Proper cleaning is non-negotiable—it extends your machine’s lifespan and prevents old coffee oils from ruining your next shot. The KAPO K2 Pro’s cleaning routine takes just 5 minutes after each use.
1. Post-Brew Instant Cleanup
Rinse the filter basket and portafilter immediately after brewing, then scrub away any leftover grounds with the cleaning brush. Press the brewing button to run hot water through the machine for 3-5 seconds—this flushes out residual oils from the brewing group to prevent clogs.
2. Daily & Weekly Maintenance
Daily: Empty any leftover water from the tank and wipe the machine’s exterior with a clean cloth.
Weekly deep clean: Mix espresso machine cleaning powder (or a citric acid solution) with water at a 1:100 ratio. Pour the mixture into the tank, run a full extraction cycle, then rinse the machine thoroughly with clean water 2-3 times until no cleaning residue or odor remains.
3. Important Do’s & Don’ts
Don’t use abrasive brushes or harsh cleaners—they can scratch the machine’s surface or damage its seals.
Inspect the portafilter’s stainless steel filter regularly; replace it if it’s bent or damaged.
When storing the machine long-term: Empty all water from the tank and internal components, then keep it in a dry, well-ventilated place.
Do NOT attempt to disassemble, repair, or replace internal parts (including the battery) on your own.
V. Final Verdict: Is the KAPO K2 Pro Worth It?
As a professional barista, I’d say this machine’s biggest strength is its perfect balance of pro-grade performance and portability. The 58mm bottomless portafilter sets it apart from basic portable machines, letting you brew genuinely high-quality espresso—ideal for enthusiasts who refuse to compromise on flavor. At the same time, its compact size and simple operation make it a lifesaver for anyone craving great coffee outside the home (whether at the campsite or the office).
For beginners, it’s the ultimate “gateway machine” to espresso mastery—watching the extraction stream in real time teaches you the fundamentals of brewing fast. For seasoned pros, its adjustable parameters offer enough flexibility to customize shots to your exact taste. It’s a great value for a portable espresso maker.
To recap the golden rules: Stick to 18-20g dose, 1:2 coffee-to-liquid ratio, and 25-30 second extraction time—then tweak based on your taste. If you run into any issues, reach out to IKAPE’s customer support team at Ikapeaftersale@outlook.com—they’re always ready to help. Enjoy every sip of your homemade, barista-quality espresso!
Frequently Asked Questions (FAQs)
1. How do I connect the KAPO K2 Pro to its app?
Ensure your phone’s Bluetooth and Location Services are enabled.
Press the coffee machine’s power button once to turn it on.
For iPhone users: Open the HappyGo CERA app → Tap My Devices → Tap the “+”icon → Tap Search for Devices at the bottom of the screen → Select your KAPO K2 Pro from the search results to complete pairing.
For Android users: Scan the QR code provided in the user manual to download the app, then follow the on-screen prompts to connect.
2. Can I use third-party filter baskets?
Yes! We’ve tested the KAPO K2 Pro with most 58mm filter baskets on the market, including:
IKAPE Precision High Extraction Basket Filter-Matrix, IKAPE Precision High Extraction Basket Filter-Clockwork, VST, Normcore Step-Down Basket, IMS, and more.
3. Does it comply with TSA carry-on regulations?
This coffee machine features a built-in lithium-ion battery. According to TSA rules, lithium-ion batteries integrated into electronic devices have relaxed carry-on restrictions—they’re allowed as long as the battery is undamaged and not subject to a product recall.
Note: Spare lithium-ion batteries have strict watt-hour limits: ≤100Wh are allowed without approval; 101-160Wh require airline approval; >160Wh are prohibited.
The KAPO K2 Pro’s built-in battery has a capacity of only 49.95Wh—well below the 100Wh threshold. It is fully compliant with TSA carry-on requirements.
For other airlines, refer to these technical specs for verification:
Built-in battery type: 21700 lithium-ion cell
Voltage: 3.7V
Capacity: 13500mAh
Output power: 150W
Power range: 10-30W
4. What roast level works best? Can I use coffee pods?
Roast recommendations:
For a rich, low-acid profile: Opt for medium-dark roasts (e.g., Brazilian, Sumatran). Just remember to adjust the extraction temperature to 88-90℃ and tweak your grind size to avoid over-extraction.
For bright, fruity notes: Light or medium roasts (e.g., Yirgacheffe, Ethiopian, Colombian) are perfect. The 58mm bottomless portafilter enhances their complex flavors and prevents the bitter aftertaste common with dark roasts.
Pod compatibility: No, this machine does not support coffee pods. The KAPO K2 Pro is designed for freshly ground coffee paired with a 58mm filter basket and bottomless portafilter—its pressure system and brewing group are not compatible with pod-based systems (which require specialized piercing mechanisms and pods). If you don’t have a grinder, just buy pre-ground coffee tailored for 58mm commercial espresso machines.